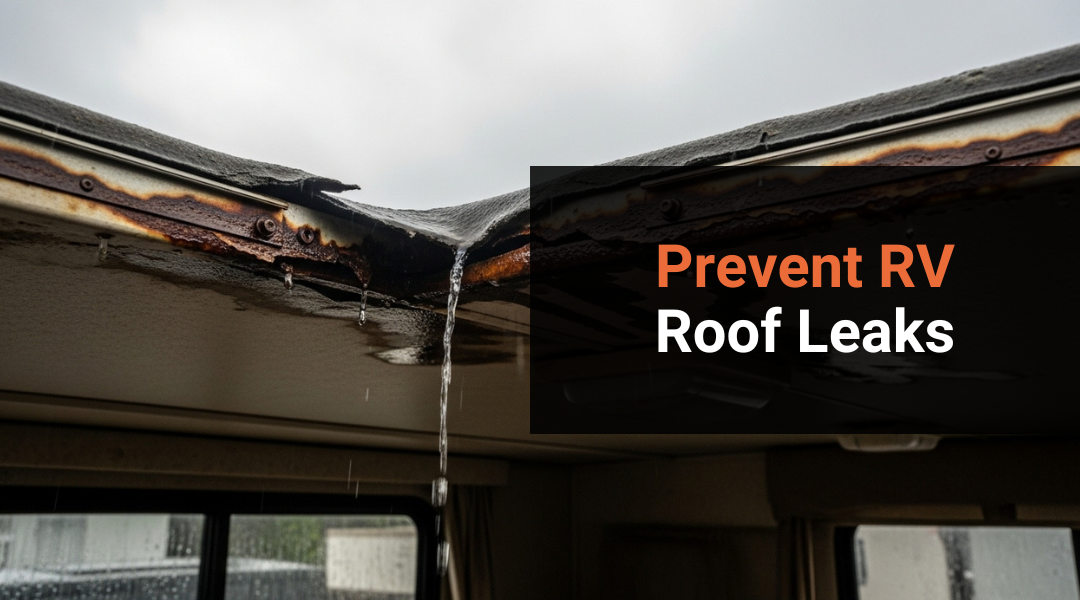
Rainy season in Huntington Beach can turn small roof cracks into major problems for older RVs. Moisture seeps through worn seams, aged sealant, or sun-damaged coatings, leading to costly interior repairs. You can prevent roof leaks in your older RV by inspecting, resealing, and reinforcing vulnerable areas before the first storm arrives. Taking action early keeps your RV dry, secure, and ready for travel.
Older RVs face unique challenges near the coast, where sun exposure and salty air speed up roof wear. Understanding how these factors weaken seals and materials helps you focus on the right maintenance steps. This guide walks you through proven methods to prepare your RV roof, avoid common DIY mistakes, and choose reliable products designed for coastal conditions.
When you want professional help, Farace’s Automotive & RV Center in Huntington Beach offers trusted expertise built on decades of experience. Their certified technicians restore and protect RV roofs with precision, ensuring your vehicle stays leak-free through every season.
Why Older RVs Are Prone to Roof Leaks in Huntington Beach
Older RVs in coastal areas face faster roof wear because of constant sunlight, salt-laden air, and temperature swings. These conditions weaken sealants, dry out rubber membranes, and corrode metal components, making RV roof leaks more common and harder to prevent without consistent maintenance.
How Age, Sun Exposure, And Salt Air Accelerate Roof Deterioration
As your RV ages, materials lose flexibility. Rubber roofs crack, fiberglass fades, and metal seams loosen. UV rays in Huntington Beach speed up this breakdown by drying sealants and bleaching protective coatings.
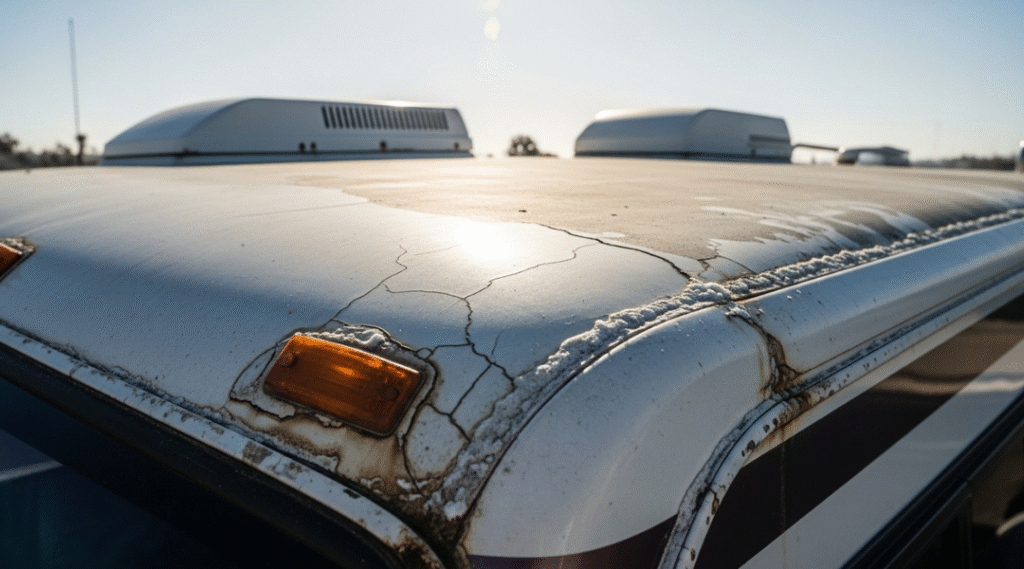
Salt in the ocean air adds another problem. It corrodes fasteners and aluminum trim, creating small gaps where water enters. Moisture trapped under aging sealant encourages mold and soft spots.
Regular cleaning and resealing slow this process. Use UV-resistant coatings and rinse salt residue often. Inspect vents, skylights, and seams every few months to catch early signs of wear before they lead to costly roof leaks.
Step-By-Step: How To Prepare Your RV Roof Before The Rain Starts
Preventive maintenance before the rainy season helps you avoid leaks, rot, and costly repairs. Focus on inspection, cleaning, sealing, and coating to strengthen your RV roof’s defenses and extend its service life.
Step 1: Inspect Seams, Vents, And Edges For Cracks Or Soft Spots
Start by safely accessing your RV roof using a stable ladder and non-slip shoes. Walk carefully, checking for soft areas that may indicate water damage beneath the surface.
Look closely at seams, vents, skylights, and edges—these are common leak points. Cracks, loose caulking, and peeling sealant often signal early deterioration. Use gentle pressure to test for movement or separation around fixtures.
If you find discoloration or bubbling, moisture may already be trapped. Mark these areas for repair. A flashlight and moisture meter can help detect hidden issues. Document your findings with photos to track wear over time. Regular inspections every six months are a key part of preventive maintenance that helps prevent RV roof leaks before they worsen.
Step 2: Clean The Roof Thoroughly To Expose Hidden Damage
Cleaning removes debris and buildup that can hide cracks or pinholes. Begin by sweeping away leaves, branches, and dirt. Use a mild cleaner suited to your roof type—such as rubber roof cleaner for EPDM or TPO and non-abrasive soap for fiberglass or aluminum.
Avoid harsh chemicals or stiff brushes that can damage the membrane. Rinse well with low-pressure water to prevent forcing moisture under seams.
Once clean, inspect again under bright light. Dirt-free surfaces make it easier to spot small defects or worn sealant. For stubborn residue, use denatured alcohol or mineral spirits with a lint-free cloth. Let the roof dry completely before applying any sealant or coating. A clean surface ensures better adhesion and longer-lasting protection.
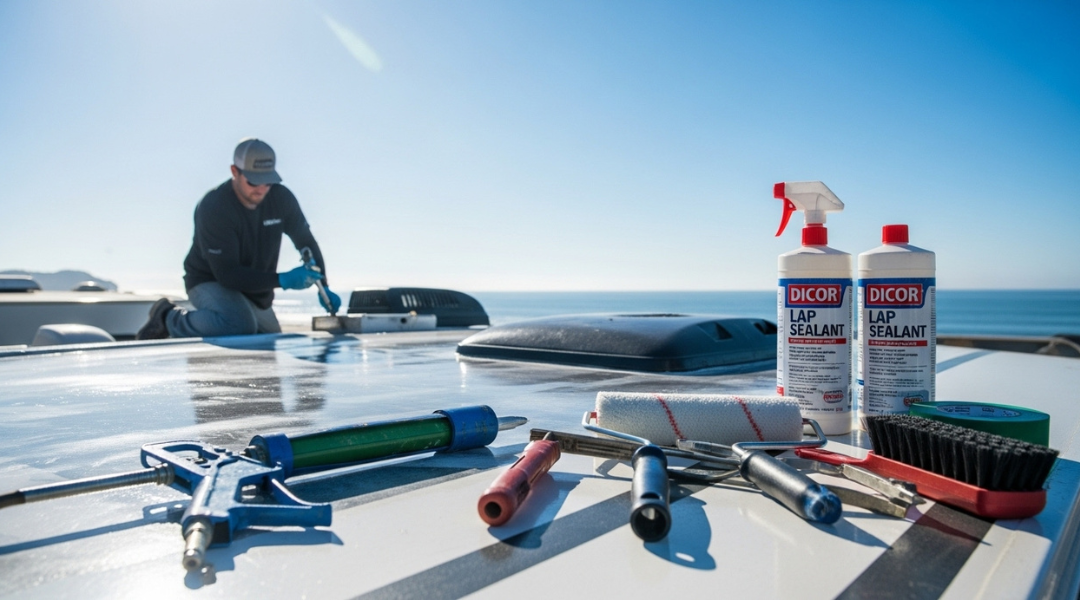
Step 3: Patch Minor Cracks With A Compatible RV Sealant
Choose a sealant compatible with your roof material. For rubber roofs (EPDM, TPO, PVC), use self-leveling lap sealant. For fiberglass or aluminum, use a flexible polyurethane or butyl-based sealant.
Remove old, loose sealant with a plastic scraper and clean the area with alcohol. Apply a smooth, even bead of new sealant using a caulk gun, filling cracks and gaps completely. For seams or larger openings, reinforce with Eternabond or roof repair tape.
Allow the patch to cure as directed—usually 24 to 48 hours. Avoid walking on the area until it sets. Proper sealing of small defects now prevents leaks that could spread during heavy rain.
| Roof Type | Recommended Sealant |
|---|---|
| EPDM/TPO/PVC | Dicor Self-Leveling Lap Sealant |
| Fiberglass | Geocel ProFlex RV Sealant |
| Aluminum | AP Product Sikasil |
Step 4: Apply A Protective Roof Coating Or Sealant Layer
A full protective coating adds another layer of defense against UV rays, standing water, and temperature changes. Select a liquid roof coating designed for your roof type—silicone for flat roofs, acrylic for sloped metal, or polyurethane for high-impact areas.
Work on a dry, mild day. Stir the coating thoroughly and apply it with a roller or brush in thin, even layers. Overlap strokes slightly to avoid gaps.
Allow proper curing time between coats if required. A bright white or reflective coating can also reduce heat buildup inside the RV. This step not only prevents leaks but also prolongs roof life by shielding it from weather exposure.
Step 5: Schedule A Professional Inspection If Leaks Persist Or Roof Damage Spreads
If you notice recurring leaks, sagging sections, or widespread cracking, schedule a professional inspection. Certified RV technicians can identify underlying structural or membrane issues that DIY repairs might miss.
They use specialized tools like moisture scanners and infrared cameras to locate hidden water intrusion. Professionals can also reseal large sections or replace deteriorated materials safely.
Regular professional evaluations—especially for older RVs—ensure your preventive maintenance plan remains effective. Combining your own inspections with expert assessments helps prevent RV roof leaks from escalating into major damage before the rainy season begins.
Cost And Time Factors For RV Roof Maintenance
Routine RV roof maintenance costs depend on the roof’s material, condition, and the type of service you choose. Labor time and materials vary widely, so planning ahead helps you budget for both professional and do-it-yourself upkeep before the rainy season.
What Affects Pricing For Inspection, Resealing, And Coating Services
Inspection costs often range from $100–$300, depending on whether you hire a mobile RV technician or visit a service center. A thorough inspection usually takes one to two hours, including cleaning and checking seams, vents, and sealant.
Resealing prices depend on roof type and sealant used. Expect $25–$40 per tube of self-leveling lap sealant, plus two to four hours of labor. DIY resealing can save money but requires proper surface prep.
Full roof coating services—common for aging rubber or fiberglass roofs—can cost $600–$1,500 and take a full day or longer. Coatings extend roof life by improving UV resistance and sealing microcracks. Regular upkeep every 12–24 months prevents costly replacements and keeps your RV maintenance routine predictable.
Common DIY Mistakes That Lead To Bigger Roof Problems
Small errors in roof maintenance can quickly escalate into major water damage inside your RV. Using the wrong materials, skipping preparation steps, or sealing over existing issues often traps moisture and weakens the roof structure. Careful inspection and methodical repair work prevent these problems from becoming costly replacements.
Why Over-Sealing, Poor Prep, Or Ignoring Small Leaks Can Cost Thousands Later
Applying too much sealant may seem like extra protection, but it often hides cracks rather than fixing them. Excess sealant can also trap moisture, causing mold, rot, and delamination in roof layers. Always clean and dry the surface before sealing to ensure proper adhesion.
Poor preparation—like skipping debris removal or failing to sand old coatings—prevents sealants from bonding correctly. This leads to peeling and new leaks after the first heavy rain.
Ignoring small leaks is another expensive mistake. Even a slow drip can damage insulation, wiring, and ceiling panels. Create a simple checklist:
| Step | Task | Frequency |
|---|---|---|
| 1 | Inspect seams and vents | Monthly |
| 2 | Clean roof surface | Every 3 months |
| 3 | Reseal minor cracks | As needed |
Consistent attention prevents minor RV leaks from turning into structural repairs that can cost thousands.
Best Products And Materials For Coastal RV Roof Protection
Coastal conditions expose your RV roof to salt air, humidity, and UV radiation that can quickly degrade seals and coatings. Using weather-resistant materials and applying them correctly helps prevent corrosion, cracking, and water intrusion.
Top Sealants, Coatings, And Tools Recommended For Huntington Beach Weather
Salt air and constant sun make flexible, UV-stable sealants essential. Products like Dicor Lap Sealant adhere well to EPDM and TPO roofs, maintaining elasticity under temperature swings. For patching small cracks or seams, Eternabond tape provides a durable, watertight bond that resists salt and moisture.
A silicone or polyurethane roof coating adds an extra layer of protection. Silicone coatings perform well in humid, coastal climates because they resist mildew and remain waterproof. Polyurethane coatings, such as Liquid Rubber Roof Coating, offer added durability against abrasion and UV exposure.
Use a soft-bristle brush, solvent-safe cleaner, and a plastic scraper to remove oxidation before applying new materials. Proper prep ensures coatings adhere tightly to your RV roof material, extending its lifespan even in the harsh Huntington Beach environment.
Why Farace’s Automotive & RV Center Is The Smart Choice In Huntington Beach
You want a reliable RV repair shop that understands both the technical and practical sides of maintaining older vehicles. Choosing a team with decades of experience and a focus on quality workmanship ensures your RV roof repair is handled correctly the first time.
Veteran-Family-Owned Experts Specializing In RV Roof Repairs And Leak Prevention
Farace’s Automotive & RV Center in Huntington Beach has served local RV owners since 1976. As a veteran-family-owned business, it combines long-term experience with a commitment to integrity and precision. You benefit from technicians who understand how California’s coastal climate affects roof materials and sealants.
Their services include:
- Roof resealing and patching to stop leaks before they spread
- Inspection of seams, vents, and skylights for early detection
- Preventive maintenance plans tailored to older RVs
You can expect straightforward communication, competitive pricing, and skilled craftsmanship that extends your RV’s lifespan and keeps you road-ready through the rainy season.
Farace’s Automotive & RV Center Services & Process
You can rely on Farace’s Automotive & RV Center for detailed inspections and precise roof resealing that extend your RV’s lifespan. Their technicians use tested materials and proven repair methods to stop leaks before they cause structural or interior damage.
How Our Technicians Inspect, Reseal, And Restore RV Roofs For Long-Term Protection
Technicians begin with a comprehensive roof inspection, checking seams, vents, and seals for cracks or soft spots. They document problem areas and test for hidden moisture using specialized tools. This step ensures every potential leak point is identified before repairs start.
Next, they remove deteriorated sealant and clean the surface thoroughly. Using high-quality EPDM or TPO-compatible sealants, they reseal seams, skylights, and edges to restore watertight protection.
For older roofs, they may apply a protective coating that adds UV resistance and flexibility. This coating helps prevent future cracking or peeling. After curing, technicians perform a final leak test and verify that all components are secure.
| Step | Action | Purpose |
|---|---|---|
| 1 | Inspect roof and seams | Identify leaks and weak points |
| 2 | Clean and reseal | Restore waterproof barrier |
| 3 | Apply protective coating | Extend roof life and prevent damage |
Conclusion & Next Steps
Inspecting and maintaining your RV roof before the rainy season reduces the risk of costly water damage. Addressing cracks, worn seals, and loose fixtures early helps preserve structural integrity and keeps your RV dry and ready for travel.
Protect Your RV Before The Next Storm — Contact Farace’s Automotive & RV Center In Huntington Beach For Expert Roof Inspections And Repairs
Schedule a professional roof inspection to assess seams, vents, and skylights for wear or gaps. Trained technicians can identify leaks that are not visible during a casual check.
At Farace’s Automotive & RV Center, specialists use reliable materials and sealing methods suited for older RV roofs. They can reseal joints, replace damaged sections, and apply protective coatings that extend roof life.
Before the next storm, make an appointment. A short visit now can prevent extensive repairs later and ensure your RV remains weather-tight through the season.