Water damage inside your RV can quickly escalate from a minor inconvenience to a catastrophic repair bill that ruins your travel plans and drains your wallet. The key to preventing costly water damage is catching the early warning signs before they become major structural problems.
Experienced RV owners know that water infiltration happens gradually through small entry points like roof seams, window seals, and slide-out mechanisms. These seemingly minor leaks can lead to rotted wood, rusted metal frames, and toxic mold growth that makes your RV unsafe and potentially worthless.
At Farace Automotive & RV Center in Huntington Beach, we’ve seen how early detection saves thousands of dollars in repairs and preserves the safety of your recreational vehicle. Understanding where water damage typically starts and recognizing the warning signs helps you protect your investment and maintain safe travels throughout Southern California and beyond.
Why Water Damage Is a Big Problem for RV Owners
Moisture infiltration leads to structural deterioration, mold growth, and costly repairs that can total thousands of dollars. Catching water damage in its early stages prevents minor leaks from becoming major structural problems.
How Moisture Causes Long-Term Damage
Water infiltration creates a cascade of structural problems in your RV. When moisture penetrates walls, floors, or ceilings, it saturates the wood framing and insulation materials.
Wood rot develops within weeks of continuous moisture exposure. The wooden studs and floor joists lose their structural integrity, creating soft spots and sagging areas.
Mold and mildew growth begins within 24-48 hours in damp conditions. These organisms spread rapidly through your RV’s ventilation system, affecting air quality and potentially causing health issues.
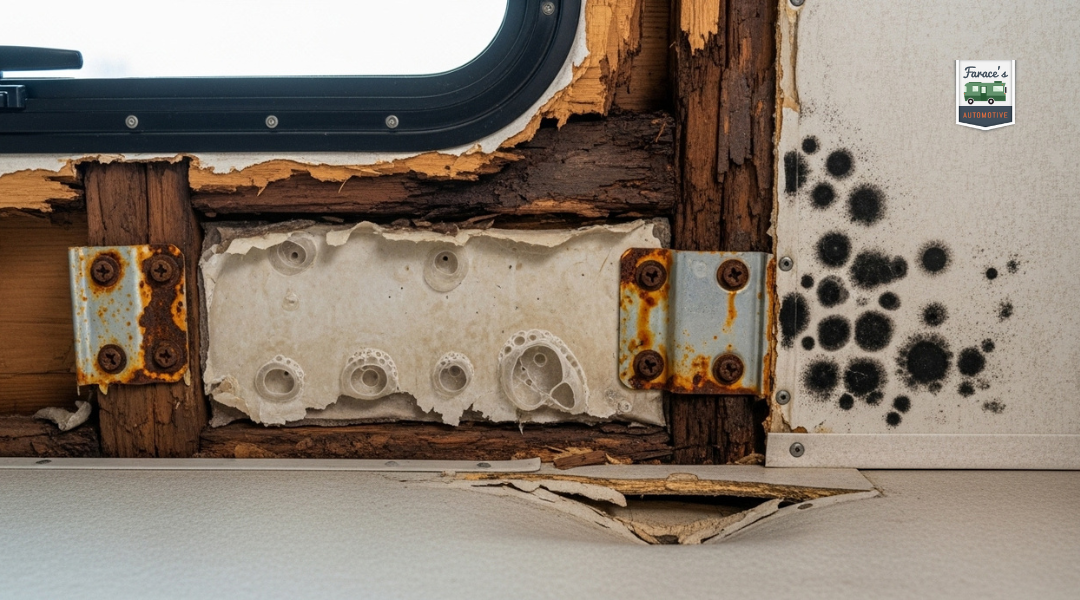
Delamination occurs when moisture separates the exterior fiberglass from the underlying wood structure. This creates bubbling or soft spots on exterior walls that require extensive repairs.
Metal components like screws, brackets, and electrical connections corrode when exposed to moisture. This corrosion weakens structural connections and creates electrical hazards.
Why Early Detection Saves Money
Early water damage detection can save you thousands in repair costs. A small roof seal repair costs $50-200, while full roof replacement runs $8,000-15,000.
Minor leak repairs typically involve:
- Resealing roof penetrations: $100-300
- Window seal replacement: $200-500
- Small wall section repair: $300-800
Major water damage repairs include:
- Floor replacement: $3,000-8,000
- Wall reconstruction: $5,000-12,000
- Complete interior renovation: $15,000-40,000
Insurance companies often deny claims for gradual water damage or pre-existing conditions. Early detection helps establish when damage occurred, improving your chances of coverage approval.
Regular inspections every three months help identify problems before they spread. Look for discoloration, soft spots, or musty odors that indicate moisture issues.
Key Signs of Water Damage Inside Your RV
Water damage often starts small but creates telltale signs that become increasingly obvious over time. These indicators range from distinctive odors and visible staining to structural changes in floors and persistent moisture problems around openings.
Musty Smells and Mold Growth
Musty odors are often the first sign of hidden water damage in your RV. These smells develop when moisture gets trapped in walls, under flooring, or behind cabinets where air circulation is poor.
Mold typically appears as black, green, or brown spots on surfaces. You’ll most commonly find it in bathrooms, around windows, and near the roof line where leaks occur.
Check these high-risk areas regularly:
- Behind the toilet and shower
- Under kitchen and bathroom sinks
- Around air conditioning units
- In storage compartments
Small mold patches may seem harmless, but they indicate ongoing moisture problems. The musty smell often becomes stronger after rain or when humidity levels rise inside your RV.
If you notice either odors or visible mold growth, address the moisture source immediately. Cleaning visible mold without fixing the underlying leak will only provide temporary relief.
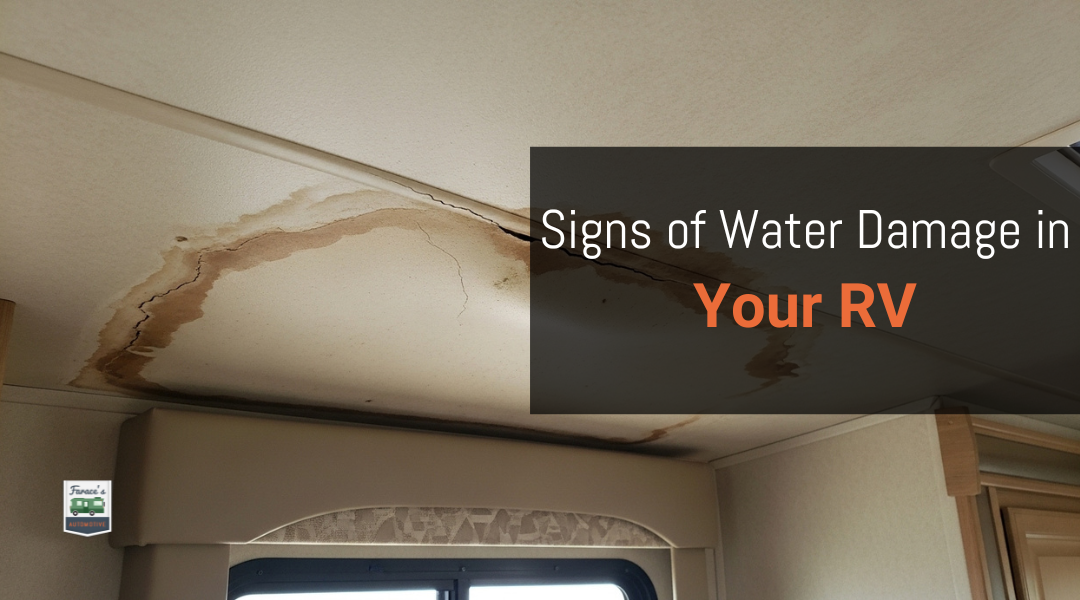
Stains or Soft Spots on Walls and Ceilings
Water stains appear as brown, yellow, or rust-colored marks on walls and ceilings. These discolorations often have irregular shapes and may expand over time as water damage worsens.
Ceiling stains typically indicate roof leaks from damaged seals around vents, air conditioners, or skylights. Wall stains often originate from window leaks or plumbing issues.
Soft spots feel spongy when you press against them. This happens when water saturates the wall material, causing it to lose structural integrity.
Test suspicious areas by gently pushing with your finger. Healthy walls feel firm and solid. Damaged areas will give slightly under pressure or feel noticeably different from surrounding surfaces.
Look for these visual indicators:
- Peeling or bubbling paint
- Wallpaper that’s lifting or curling
- Discolored caulking around fixtures
Document any stains with photos and measurements. This helps you monitor whether the damage is spreading and assists repair professionals in diagnosing the source.
Warped Floors or Damaged Cabinets
Floor warping creates uneven surfaces that feel unstable underfoot. Water-damaged flooring may buckle, cup, or separate at the seams. Laminate and vinyl floors often show these problems more obviously than carpet.
Walk through your RV and notice any areas where the floor feels soft, bouncy, or uneven. Pay special attention to areas near the bathroom, kitchen sink, and entry doors.
Cabinet damage manifests in several ways:
- Doors that won’t close properly
- Drawers that stick or bind
- Visible swelling of cabinet faces
- Separation of laminate from cabinet cores
Kitchen cabinets under the sink are particularly vulnerable to water damage from plumbing leaks. Check the cabinet floor for warping, staining, or soft spots.
Bathroom vanities face similar risks from sink and toilet leaks. Look for gaps between the cabinet and wall that weren’t there before, as this indicates swelling from moisture absorption.
Condensation Around Windows and Vents
Persistent condensation on windows, walls, or around vents signals poor ventilation or active water intrusion. While some condensation is normal in humid conditions, constant moisture creates ideal conditions for mold growth.
Check window frames for water droplets, especially in the morning. Excessive condensation may indicate failed window seals or inadequate interior ventilation.
Vent-related moisture problems include:
- Water stains around bathroom exhaust fans
- Condensation on walls near roof vents
- Moisture buildup around air conditioning units
Inspect the caulking around windows and vents regularly. Cracked or missing caulk allows water to penetrate the RV’s exterior and create interior moisture problems.
Feel around window and vent frames for dampness or soft spots in the surrounding wall material. These areas should remain dry under normal conditions.
Consider using a moisture meter to measure humidity levels in problem areas. Readings consistently above 60% indicate ventilation issues that need attention.
Where Water Damage Usually Starts
Water damage in RVs typically begins at roof seals, window frames, and plumbing connections where materials expand and contract during travel. These vulnerable areas allow moisture to penetrate walls and floors before visible signs appear.
Roof and Seals
Your RV’s roof experiences the most exposure to weather and road vibration. Roof seams between panels and membrane edges develop small cracks that allow water penetration.
Seal points around roof fixtures create the highest risk areas:
- Air conditioning units
- Vent fans
- Satellite dishes
- Solar panels
- Ladder mounts
The front cap seal where your roof meets the front wall takes constant wind stress while driving. This area commonly develops gaps that let water flow down interior walls.
Slideout seals stretch and compress thousands of times during use. The rubber gaskets dry out and crack, especially at corners where three surfaces meet.
Check these seals every six months for brittleness, gaps, or separation. Small cracks expand quickly once water freezes inside them during cold weather.
Windows, Doors, and Vents
Window frames experience significant stress from road vibration and temperature changes. Putty tape seals around window perimeters harden over time and lose their waterproof barrier.
Entry door frames develop leaks at the bottom corner where water pools during rain. The door sweep and threshold seal wear from constant foot traffic.

Exterior storage compartments have seals that compress unevenly when doors warp from heat. Water enters these spaces and travels through shared walls into living areas.
Vent covers for bathrooms and kitchens have plastic housings that crack from UV exposure. These small cracks allow water to reach the ceiling material underneath.
Exterior outlets and cable connections rely on foam gaskets that deteriorate. Water enters through loose covers and flows down electrical conduits into walls.
Plumbing Lines and Appliances
Your RV’s plumbing system has numerous connection points that develop leaks over time. Fresh water lines run through walls and floors where fittings loosen from vibration.
Hot water heater connections experience thermal expansion that loosens threaded fittings. These leaks often start small and remain hidden behind access panels.
Toilet base seals fail when the floor flexes during travel. Water seeps under the toilet and saturates subflooring before becoming visible.
Shower and tub surrounds have caulk joints that shrink and crack. Water penetrates behind wall panels and creates hidden damage in framing.
Exterior shower connections freeze and burst in cold weather. These outdoor faucets have exposed plumbing that’s vulnerable to temperature extremes.
Ice maker water lines and washing machine connections use flexible hoses that develop pinhole leaks. Check these appliance connections regularly for moisture or mineral deposits.
How to Catch Water Damage Early
Early detection requires systematic inspection of your RV’s most vulnerable areas combined with professional assessment when problems exceed basic visual checks. Acting within 48 hours significantly reduces repair costs and prevents secondary damage.
Simple DIY Checks You Can Do
Start by examining your RV’s ceiling and walls for discolored patches, soft spots, or water stains. Press gently on these areas – damaged sections will feel spongy or give way under pressure.
Check around all windows and doors for moisture, peeling caulk, or warped frames. Run your hand along these seals to detect dampness that isn’t visible.
Inspect the area behind your toilet where the flexible water line connects to the shut-off valve. Look for moisture, rust, or signs of wear at both connection points.
Monthly roof inspections should focus on:
- Cracks in sealant around vents and fixtures
- Loose or missing caulking
- Sagging areas that could collect water
- Damaged roof membrane or coating
Monitor your RV’s storage compartments and basement areas for musty odors, which often indicate hidden moisture problems before visible damage appears.
Use a moisture meter on suspicious areas to detect elevated humidity levels in walls and flooring materials.
When to Call a Professional for Inspection
Contact professionals when you discover soft or spongy flooring that could indicate structural damage beneath the surface. These issues require specialized equipment to assess the extent of damage.
Persistent musty odors without an obvious source need professional investigation. Hidden moisture behind walls or under flooring can create health hazards and structural problems.
If you find multiple water damage locations, this suggests systematic issues with your RV’s weatherproofing that require comprehensive evaluation.
Call experts immediately when you notice wood rot or structural sagging. These conditions indicate moisture has compromised your RV’s frame integrity and safety systems.
Professional assessment becomes necessary when DIY repairs fail to stop recurring leaks or moisture problems in the same locations.
Professional RV Repair Solutions in Huntington Beach
Farace Automotive & R.V. Center brings over 40 years of specialized experience to water damage detection and repair. Their veteran-family-owned business combines advanced diagnostic techniques with comprehensive preventive maintenance programs.
How Farace Automotive Identifies and Fixes Damage
Farace Automotive uses systematic inspection methods to locate water damage in your RV. Their technicians examine all roof and body seams, checking sealants for deterioration or failure.
Advanced Detection Techniques:
- Moisture meter readings in walls and flooring
- Visual inspection of ceiling stains and discoloration
- Checking window and door seal integrity
- Testing plumbing connections and fixtures
The repair process begins with complete damage assessment. Technicians remove damaged materials including insulation, paneling, and subflooring when necessary.
Repair Services Include:
- Structural wood replacement
- Insulation restoration
- Interior panel installation
- Roof membrane repair
- Sealant application and weatherproofing
Your RV receives quality materials that match original specifications. All repairs come with documentation for insurance claims when applicable.
Preventive Maintenance Options
Regular maintenance prevents costly water damage repairs. Farace Automotive offers scheduled inspection services to catch problems before they escalate.
Annual Maintenance Package:
- Complete roof inspection and resealing
- Window and door seal replacement
- Plumbing system pressure testing
- Appliance connection checks
Seasonal Services:
- Pre-trip safety inspections
- Post-storage condition assessments
- Winterization and de-winterization
- Emergency mobile repair availability
Their maintenance programs extend your RV’s lifespan significantly. You receive detailed reports identifying potential issues and recommended service intervals.
Located at 18262 Gothard St in Huntington Beach, they serve Orange County RV owners with comprehensive repair and maintenance solutions.