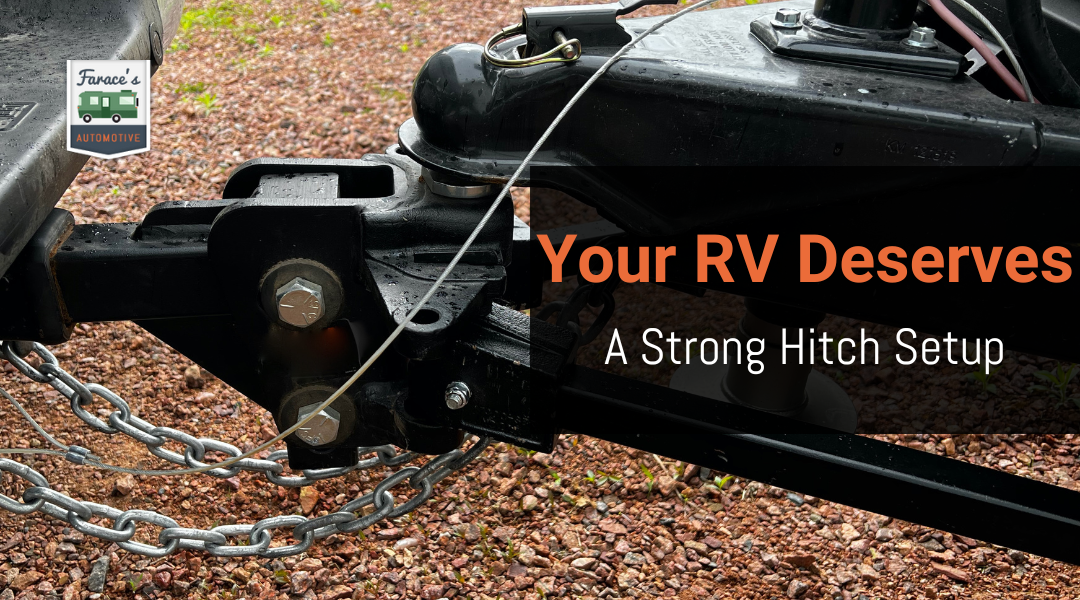
Installing a trailer hitch is an essential step for safe towing, especially if you own a travel trailer or any other type of recreational vehicle. Understanding how to properly install a hitch can prevent accidents and ensure that your towing experience is smooth and secure. At Farace Automotive & RV Center, we know that the right equipment and knowledge are crucial in achieving this.
With years of experience in RV repairs and a commitment to helping you stay safe on the road, our team is here to guide you through the installation process. We’ll cover everything from selecting the right hitch for your vehicle to proper techniques for securing your trailer. Moreover, we focus on ensuring your RV security while towing, so you feel confident during your travels.
Whether you’re a seasoned camper or new to the RV world, learning how to install and use a trailer hitch can enhance your adventures. Let’s dive in and equip you with the skills you need to tow safely and efficiently.
Trailer Hitch Types and Load Ratings Explained
Understanding trailer hitch types and their load ratings is essential for safe towing. You must use the right hitch class for your trailer and know how to evaluate weight limits. This will ensure that your vehicle, hitch, and trailer work well together.
Common Hitch Classes (I–V) and Their Applications
Trailer hitches are classified into five main classes based on their towing capacity. Each class serves different purposes.
- Class I: Up to 2,000 pounds GTW. Common for light trailers like bike racks or small utility trailers.
- Class II: Up to 3,500 pounds GTW. Suitable for larger utility trailers and small campers.
- Class III: Up to 8,000 pounds GTW. This class is versatile and fits most mid-sized trailers, including boats.
- Class IV: Up to 10,000 pounds GTW. Designed for heavy-duty towing, such as larger campers and equipment trailers.
- Class V: Over 10,000 pounds GTW. Used for the heaviest loads, like large trailers and towing vehicles.
Choosing the correct class ensures your towing setup operates safely within weight limits.
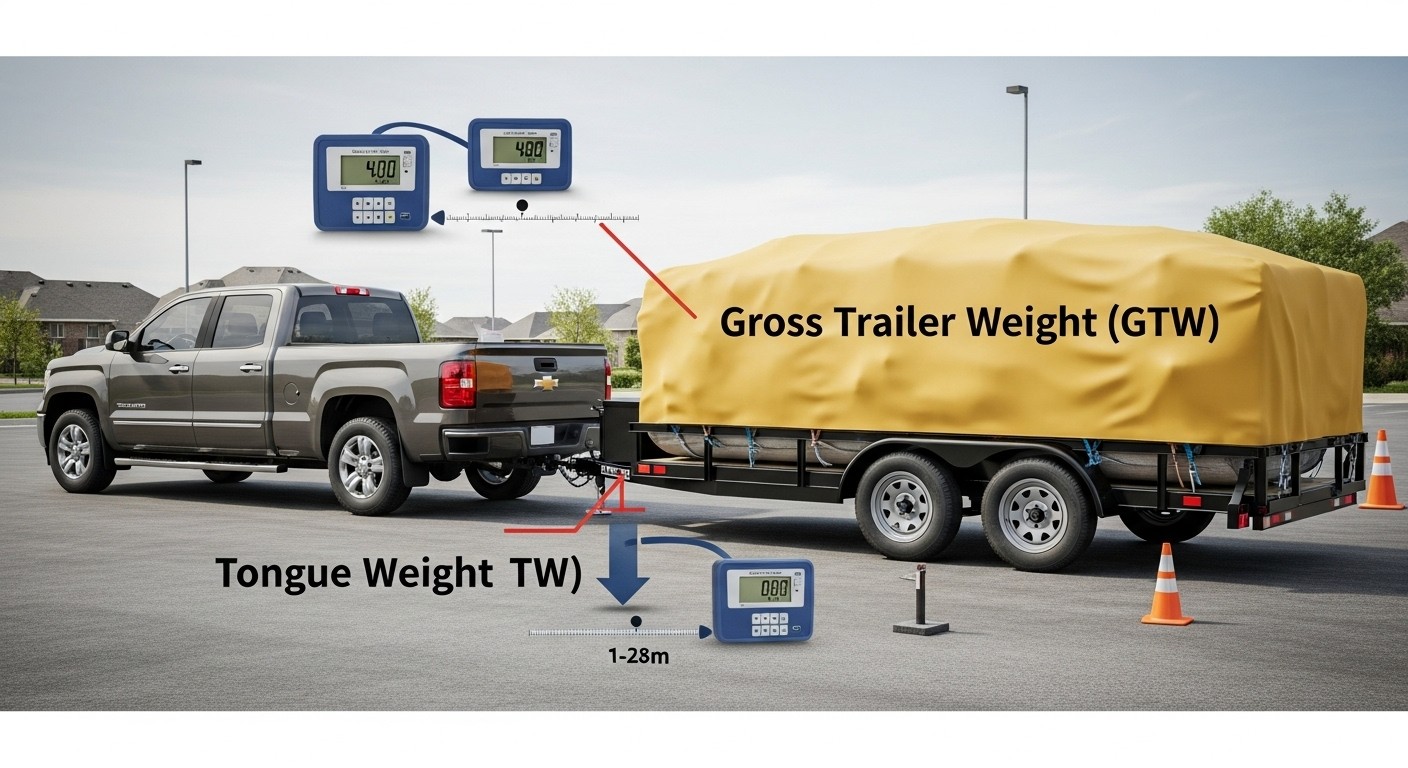
Assessing Gross Trailer Weight (GTW) and Tongue Weight (TW)
Gross Trailer Weight (GTW) refers to the total weight of the trailer and its cargo. This needs to be within the limits set by your hitch class.
Tongue Weight (TW) is the downward force that the trailer exerts on the hitch. A safe TW is generally 10% to 15% of the GTW.
For example, if your trailer’s GTW is 5,000 pounds, aim for a TW between 500 and 750 pounds. This balance is crucial for stable towing and prevents swaying while on the road.
Matching Hitch, Receiver, and Vehicle Capabilities
Matching your hitch to your vehicle’s specifications is vital for safety.
Ensure your vehicle can handle the maximum GTW and TW indicated by the hitch class. Consult your owner’s manual for guidance on towing limits.
Receiver sizes also vary, typically ranging from 1.25 inches to 2 inches, impacting what hitch you can use.
To achieve the best fit, consider using adapters if necessary, but know they may affect weight limits. Proper alignment of all parts will ensure a secure and efficient towing experience.
Selecting the Right Trailer Hitch for Your Vehicle and Load
Choosing the right trailer hitch is crucial for safe towing. You need to consider your vehicle’s specifications, different hitch styles, and additional accessories that can enhance your towing experience.
Considering Vehicle Make, Model, and Towing Packages
Your first step is to check the make and model of your vehicle. Each vehicle has a specific towing capacity. This capacity is listed in your owner’s manual and determines how much weight you can safely tow.
Next, consider if your vehicle comes with a towing package. A towing package often includes features like a stronger frame, additional cooling systems, and pre-wired connections. These features prepare your vehicle for a safe towing experience.
Make sure to choose a hitch compatible with your vehicle’s towing capacity. A mismatch can lead to serious safety issues while towing.
Fixed vs. Detachable vs. Gooseneck/5th-Wheel Hitches
There are several types of hitches. Fixed hitches are permanent and often more robust. They are great for frequent towing but can limit your vehicle’s access when not towing.
Detachable hitches offer flexibility. You can remove them when not in use, making your vehicle more visually appealing and easier to park.
Gooseneck and 5th-wheel hitches are designed for larger loads. They distribute weight more evenly in the truck bed, making them suitable for bigger trailers like RVs. Choose based on the type of trailer you own and how often you plan to tow.
Additional Accessories: Weight Distribution, Sway Control, Hitch Balls
To ensure safe towing, consider using weight distribution systems. These accessories help distribute the trailer’s weight evenly across your tow vehicle, improving stability.
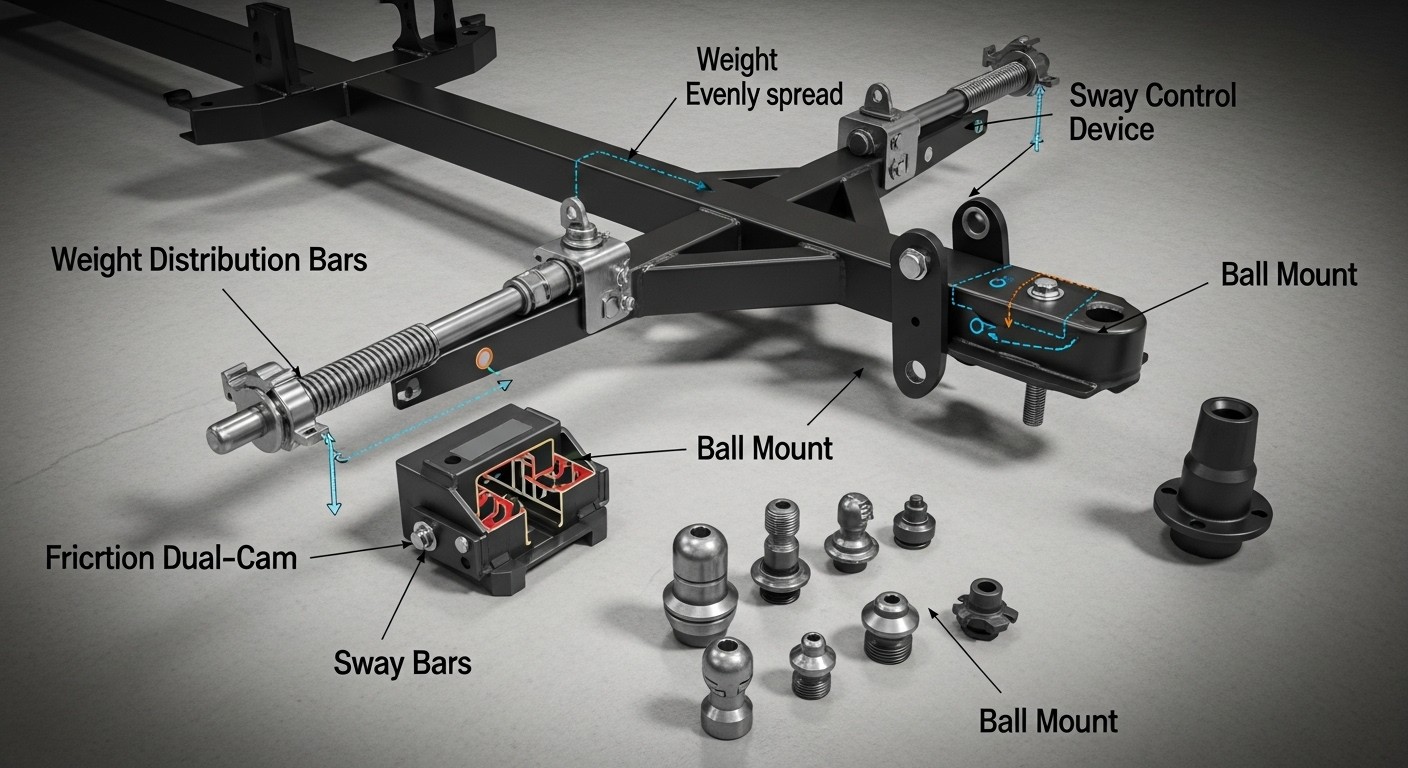
Sway control devices are also critical. They reduce the side-to-side motion of the trailer, making your drive safer and more comfortable.
Don’t forget about hitch balls and ball mounts. The hitch ball must match the trailer coupler size. Choose the right ball mount to manage weight effectively. This ensures all components work together smoothly, enhancing your towing safety.
Step‑by‑Step Installation Process
Installing a trailer hitch involves several steps to ensure safety and functionality. This process requires careful preparation, the right tools, and attention to detail. Follow these instructions closely for a secure and effective installation.
Preparing the Vehicle Undercarriage and Receiver Mounting Points
Start by cleaning the vehicle’s undercarriage where the hitch will be installed. Remove any dirt, rust, or debris from the receiver mounting points to ensure a strong connection. Inspect the area for any obstructions or signs of damage.
You may need to loosen or remove certain components, like the exhaust or spare tire, to access the mounting points easily. Consult your vehicle’s manual for specific guidance on what to remove. Once the area is clear, align the hitch receiver against the undercarriage.
Mark the locations for drilling, if required. For some vehicles, it may be necessary to drill holes for bolts or fasteners. Ensure that everything aligns correctly before proceeding to the next step.
Tools, Torque Requirements, and Hardware Check
Gather all the necessary tools before you begin the installation. Common tools include a socket wrench set, torque wrench, drill, and safety goggles. Verify that you have the correct bolts and hardware that come with the hitch kit.
Check the torque specifications provided by the manufacturer. These requirements are essential for ensuring the hitch is securely fastened. Use a torque wrench to tighten the bolts according to those specifications.
Ensure all your tools are in good condition. Using rusted or worn-out tools can lead to problems during installation. A quick inventory now can save you time later.
Aligning, Securing, and Torque‑Tightening the Hitch
Position the hitch receiver at the marked locations under your vehicle. Insert the bolts through the hitch and into the mounting holes. Make sure the hitch is level and secure.
Tighten the bolts by hand first, ensuring the hitch does not shift. Once it is secured in place, use the torque wrench to tighten the bolts to the specified settings.
Check for any movement after you have tightened everything. The hitch should be firmly attached without any wobbling. If you notice any issues, double-check your alignment and tighten again.
Testing Fit and Clearance with Trailer Coupler
After the hitch is installed, test the fit with your trailer coupler. Attach the coupler to the hitch and ensure it fits snugly. There should be no gaps or excess movement when connected.
Check the clearance between the trailer and the vehicle. Make sure the trailer can move freely without any obstruction from the vehicle. This is crucial for safe towing on the road.
Additionally, perform a quick visual inspection of the entire installation. Look for any signs of misalignment or loose bolts before hitting the road. Proper adjustment now can prevent issues during towing.
Electrical Hook‑Up and Brake Control Setup
Proper electrical connections and brake control setup are essential for safe towing. This section covers how to install a wiring harness, set up different types of trailer brake controllers, and inspect your lights and signals.
Installing Wiring Harness and Power Connections
Begin by selecting the correct wiring harness for your vehicle and trailer. This ensures compatibility and safety. You can find vehicle-specific harnesses at many automotive stores or online.
To install, first disconnect the vehicle’s battery. Secure the harness to the vehicle’s frame using zip ties. Connect the power leads to the vehicle’s battery and ensure all connections are tight.
Next, connect the trailer connector to the harness, typically located near the hitch. Secure the connector to avoid any movement while towing. Lastly, reconnect the battery and test the connections with a multimeter. This ensures that power is reaching the necessary components for safe operation.
Setting Up Trailer Brake Controllers (Electric vs Hydraulic)
When setting up a brake controller, you need to choose between an electric or hydraulic model. Electric controllers are common and easy to install. They provide proportional braking based on the vehicle’s speed and braking force.
For an electric controller, connect it to your vehicle’s wiring harness. Follow the manufacturer’s instructions carefully for specific connection points. Adjust the settings according to the trailer’s weight and brake responsiveness.
Hydraulic controllers are more suited for trailers with surge brakes. These operate based on the trailer’s movement rather than electrical signals. Ensure proper installation to allow fluid flow. Test the system to confirm that brakes engage correctly.
Inspecting and Testing Lights, Signals, and Breakaway Systems
After installation, inspect all lights and signals on the trailer. Ensure that brake lights, turn signals, and running lights are functioning properly. Connect the trailer to the vehicle and use the vehicle’s light controls to check each function.
Next, test the breakaway system. This is crucial for safety. The breakaway system activates the trailer brakes if it disconnects from the tow vehicle. Pull the breakaway pin to ensure it works correctly and stops the trailer.
If lights do not work, check the fuses and connections. Make adjustments as needed to ensure everything operates safely before heading out on the road. Regular inspections can prevent issues and enhance towing safety.
Loading, Weight Distribution, and Hitch Adjustments
When towing a trailer, proper loading and weight distribution are essential for safety and stability. Adjusting your hitch and using the right tools will help ensure a balanced ride. Follow these guidelines for effective loading and adjustments.
Properly Loading the Trailer for Balanced Weight
Start by ensuring that your trailer is loaded evenly. Distribute weight from side to side and front to back. Aim for about 60% of the weight to be in the front half of the trailer. This helps with stability and reduces the risk of swaying.
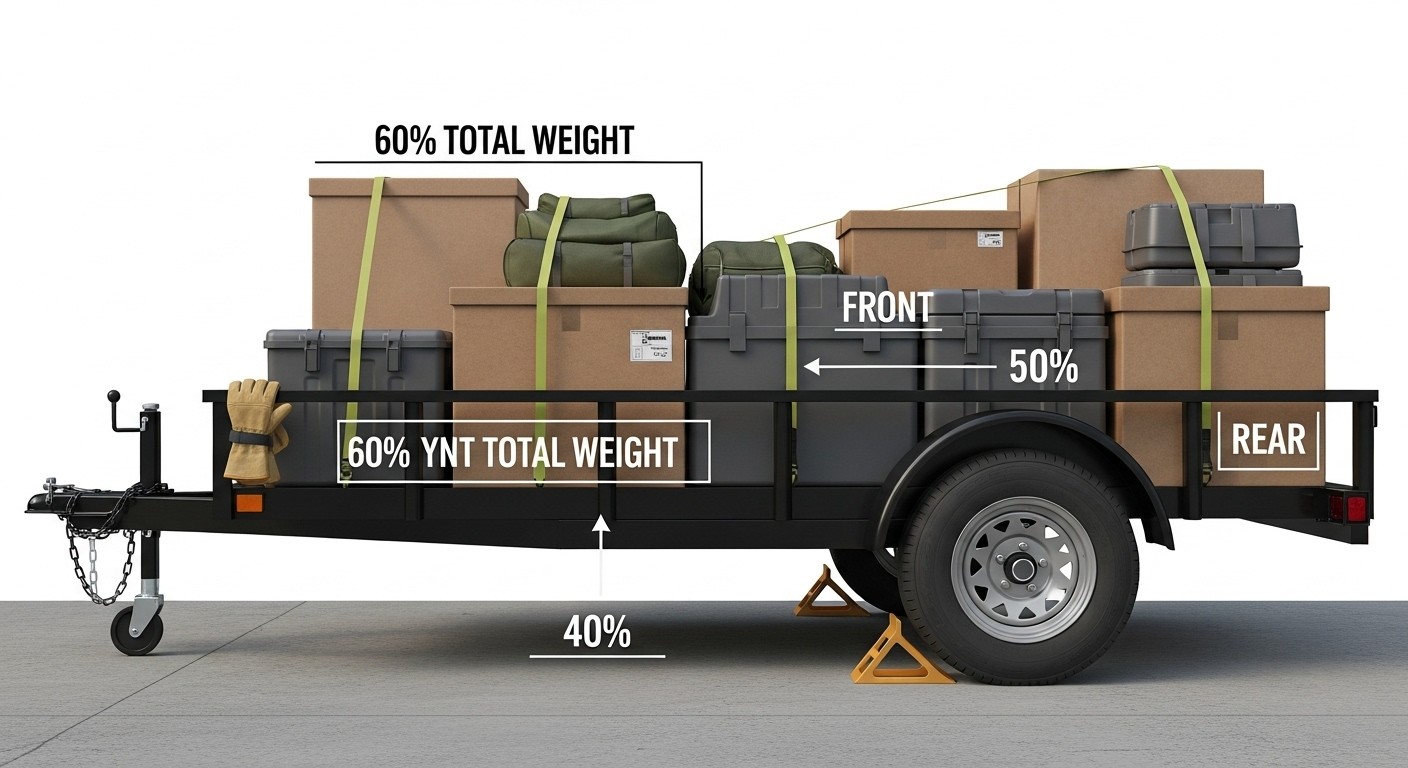
Place heavier items low and secure them properly to prevent shifting during transit. Use a tongue jack to assist in lifting the trailer while loading. Keep an eye on the maximum tongue weight, which should generally be 10-15% of the total trailer weight.
Always double-check that the cargo is properly secured. Unsecured loads can cause instability and affect towing performance. You want a safe hitch setup, so balance your load before hitting the road.
Using Weight Distribution and Sway Control Tools
A weight distribution hitch can greatly improve your towing experience. This tool redistributes the weight of the trailer across all axles of your vehicle. This helps to prevent sagging, which can affect vehicle handling.
Sway control tools also play a crucial role in safe towing. They work alongside your weight distribution system to reduce swaying caused by wind or road conditions. Look for hitches that include both weight distribution and sway control features for the best setup.
Using these tools can enhance safety and comfort while towing. Before starting your trip, ensure that these devices are correctly installed and adjusted.
Adjusting Hitch Height, Drop/Rise, and Torque After Loading
Once loaded, it’s time to adjust your hitch height. This ensures that the trailer is level when connected to your vehicle. A level trailer helps keep weight evenly distributed, improving handling.
Use a trailer jack to assist with adjustments. Measure from the ground to the bottom of the coupler when your trailer is level. If it’s too high or low, you may need a hitch with the correct drop or rise to achieve the right fit.
Lastly, check the torque on all fasteners to ensure they are secure. Proper torque prevents any movement or loosening while you drive. Always remember that every adjustment affects your towing setup, so take your time to get it right.
Safe Hitching Procedures and Pre‑Tow Checklist
Before you hit the road, it’s crucial to ensure that your trailer is securely hitched and ready for towing. Following safe hitching procedures and completing a pre-tow checklist can prevent accidents and ensure a smooth journey.
Engaging the Coupler and Secure Latching
Begin by positioning the trailer so that the coupler is aligned with the hitch ball. Lower the coupler onto the ball until it fully seats. Then, raise the locking lever to engage the coupler securely. Always check that the coupler is locked in place.
Make sure to test the latch by pulling up on the coupler. It should stay attached. If your hitch has a pin lock, insert it now to prevent accidental disengagement. Regularly inspect the coupler for wear or damage to ensure safety during towing.
Installing Safety Chains, Pin Locks, and Hitch Pins
Next, install safety chains. Cross them underneath the trailer tongue and attach them to the hitch. This way, if the coupler fails, the chains will catch the trailer and prevent it from disconnecting completely.
Secure pin locks and hitch pins to ensure all components are locked in. These additional measures provide an extra layer of security. Always check that the chains and pins are tight and in good condition before starting your journey.
Pre‑Departure Safety Checklist (Lights, Tires, Brakes, Fluids)
Before departing, perform a thorough check of your trailer.
- Lights: Test all lights, including brake lights, turn signals, and running lights, to ensure they function properly.
- Tires: Check tire pressure; it should conform to the manufacturer’s specifications. Inspect for any visible wear or damage.
- Brakes: Ensure your trailer brakes are working effectively. Adjust them as needed to ensure responsiveness.
- Fluids: Check your vehicle’s fluids—like brake fluid and transmission fluid—to avoid problems on the road.
Finally, remember to engage the parking brake and use wheel chocks to prevent any movement before you leave. This is particularly important when parking on slopes.
Best Practices During Towing
Towing a trailer requires good driving techniques and constant attention to how the trailer behaves. You need to master control during turns, braking, and reversing. Monitoring the trailer’s performance along the way is equally important. If issues arise, knowing how to handle emergencies can make all the difference.
Driving Techniques for Turning, Braking, and Reversing
When turning, always take wide turns. This prevents the trailer from hitting curbs or obstacles. Signal your intentions well in advance and reduce speed gradually.
For braking, allow extra distance. The added weight of the trailer means you need more time to stop. Use your vehicle’s brakes gently to avoid skidding.
When reversing, position your hand at the bottom of the steering wheel. Move the wheel in the direction you want the trailer to go. Go slow and use your mirrors to maintain awareness of your surroundings.
Monitoring Trailer Behavior and Re‑Adjusting as Needed
Keep an eye on the trailer while driving. Look for signs like swaying or leaning. These indicate that you may need to adjust your speed or steering.
Check your trailer’s brake lights and turn signals regularly to ensure they operate properly.
If you experience sway, consider reducing speed. You may also need to adjust the load in the trailer for better balance. If the problem continues, safely pull over and examine the hitch and load distribution.
Emergency Maneuvers and What to Do If Things Go Wrong
If you find yourself in a difficult situation, remain calm. Do not slam on the brakes as this can cause a skid or loss of control.
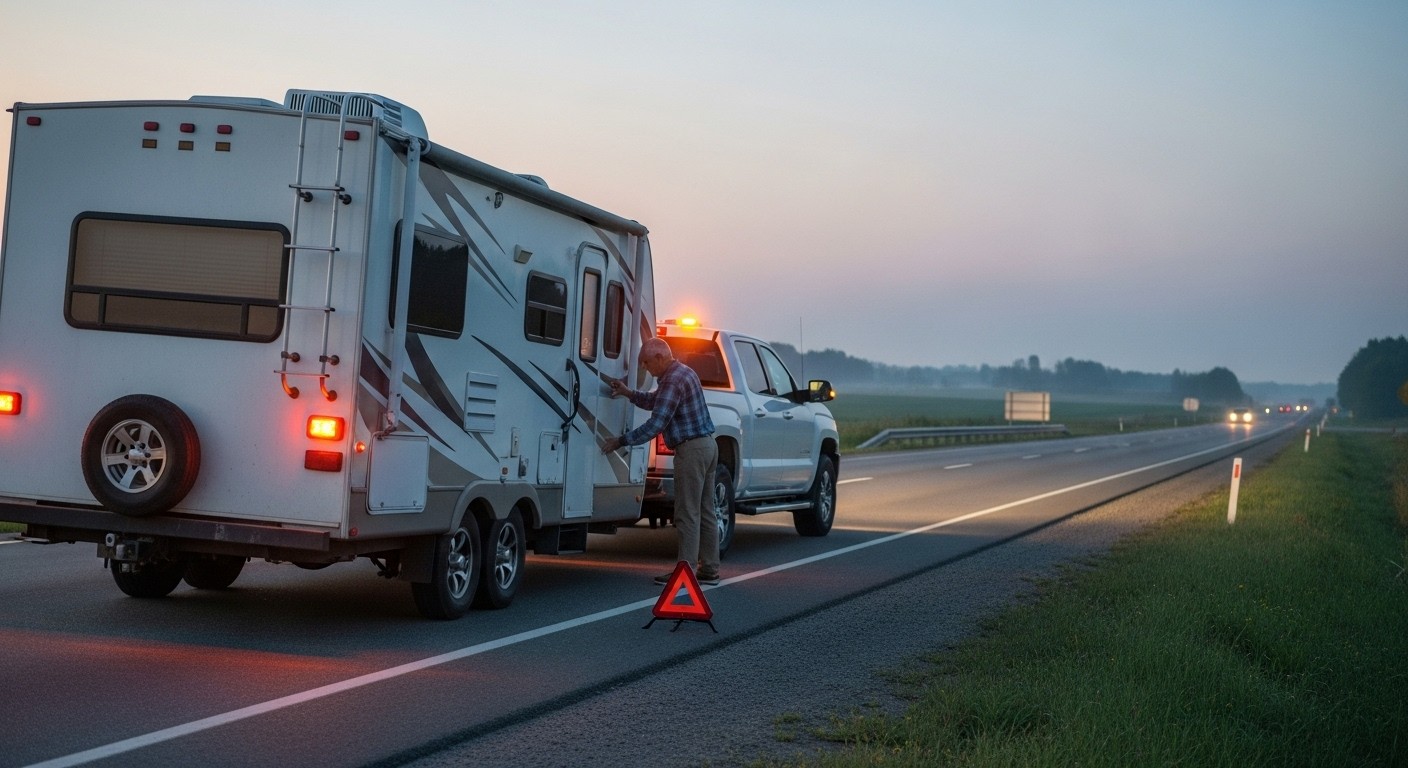
Instead, gently ease off the accelerator. Allow the vehicle to slow down gradually. If the trailer begins to sway, steer straight to regain control.
If you must stop, find a safe area off the road. Activate your hazard lights to alert other drivers. Always double-check that the hitch is secured before continuing your journey. This will help ensure a safe towing experience.
Maintaining Trailer Hitch and Tow Components
To ensure safe towing, it’s vital to maintain your trailer hitch and related components. Regular inspections and upkeep can prevent problems and improve performance on the road.
Inspecting for Rust, Loose Bolts, or Damage
Start with a visual inspection of your trailer hitch. Look for any signs of rust that may weaken the metal. Pay attention to areas where moisture can accumulate, as these spots are prone to corrosion.
Next, check all the bolts and fasteners. Loose bolts can lead to hitch failure during towing. Use a wrench to make sure everything is tight and secure.
Finally, examine the hitch itself for visible damage. Cracks or bent components indicate that you may need to replace parts. Remember, safety is your priority. Inspect these components at least once a month.
Lubrication, Cleaning, and Electrical Connections
Proper lubrication is crucial for smooth operation. Use a high-quality grease on the moving parts of your hitch. This will help reduce friction and wear over time.
Cleaning is another important aspect of maintenance. Remove dirt and debris from the hitch and connections. Use a soft brush or cloth to ensure everything is free from grime.
Don’t forget about electrical connections as well. Inspect wiring and plug sockets for wear and tear. Moisture can lead to corrosion, which may cause electrical failures. Secure any loose connections to maintain reliable towing performance.
Periodic Re‑Torquing and Re‑Calibrating Brake Controllers
Re-torquing your hitch components should be done periodically. This is particularly important after the first few uses. Bolts can settle, leading to a need for readjustment.
Next, focus on your brake controllers. Over time, they may require recalibration for safe towing. If you notice any issues with braking performance, check the controller settings and adjust as needed.
Regular maintenance of these systems will keep you safe while towing. It also extends the life of your hitch and trailer, ultimately saving you money and hassle in the long run.
When to Seek Professional Help from Farace Automotive & R.V. Center
Installing a trailer hitch can be complex. There are key areas where professional assistance is important to ensure safety and proper function. Here’s what you should know.
Professional Hitch Fitment and Alignment
Choosing the right hitch for your vehicle is crucial. A professional can help determine the right fitment based on your vehicle type and towing needs.
Improper installation can lead to issues like sway or even detachment while driving. When you let experts handle the installation, you can be confident in the alignment and secure fit of the hitch.
A technician will also inspect your vehicle’s frame to ensure compatibility. This step is essential to avoid damage and ensure safe towing.
Electrical and Brake Control Installation Services
If you’re adding lights or a brake controller, professional help is advisable. These components are vital for safe towing. Incorrect wiring or setup could lead to malfunction, risking safety while on the road.
Experts at Farace Automotive & R.V. Center ensure that all electrical connections are made properly. They also check that the brake controller is synced with your vehicle, allowing for smooth operation.
Taking the DIY route can result in costly mistakes. Ensure that all electrical systems do their job effectively by relying on trained professionals.
Comprehensive Tow-Safety Inspections and Test Tows
After installation, safety inspections are important for peace of mind. A comprehensive tow-safety inspection checks all components, ensuring everything is functioning well.
Test tows are also crucial. This allows you to experience how your vehicle handles the load. Professionals can spot any potential issues that you might overlook.
At Farace Automotive & R.V. Center, you’ll benefit from thorough checks that help prevent accidents. It’s a smart step to take before hitting the road with your trailer.